Showing posts with label recipe. Show all posts

Friday, December 7, 2012

sourdough beginnings

I've been waiting all week to use this stuff... what I am finding out about cooking my own food for the first time... it actually takes time. Imagine that. I'm so used to having things ready NOW or grabbing something quick and easy and nowadays, I've realized that if its quick and easy, most likely, there has been a nutritional sacrifice somewhere along the road. Food takes time.

Take, my sourdough bread...
It has taken me a long time to try this. I just wasn't ready... but what has been really interesting about this whole "real food" process... Readiness comes in time. With new cooking skills has come the desire to actually try new things. Crazy. And... like anything else... practice makes perfect (or at least better than before!). Cooking has become a joy to me. Its so fun! (This should offer much hope to those of who who dislike anything "kitchen". I am a recovering kitchen-phobe. There is hope!)

The nutritional benefits of homemade sourdough bread have been my latest of readings. (HERE is a good basic article about such benefits.) Commercial yeast is full of hidden MSG and is not the "natural" way to make bread rise. So, making my own sourdough bread from scratch proved to be a little more complicated than I anticipated. I couldn't just mix stuff together, bake it, then eat it??? It would take me a WEEK to get the right dough!??!!? Ya, it does... but it has been such a cool process!!!

I followed the recipe from Nourished Kitchen found HERE:
photo source: sourdoughstarter2.jpg


Wow... is this how people in the olden days made bread?! YES! And we wonder why gluten intolerance has risen since the introduction of processed grains?!

Traditionally prepared sourdough, even when made with wheat, can usually be tolerated by those who are gluten intolerant (because the sourdough starter is a live active culture. It is probiotic bread that has been soaked and the gluten has been effectively broken down by the yeast and bacteria in the starter) CRAZY!

Ok, so if I would have read this a month ago, I would be lost and confused and turned off... Well each in their own time right?

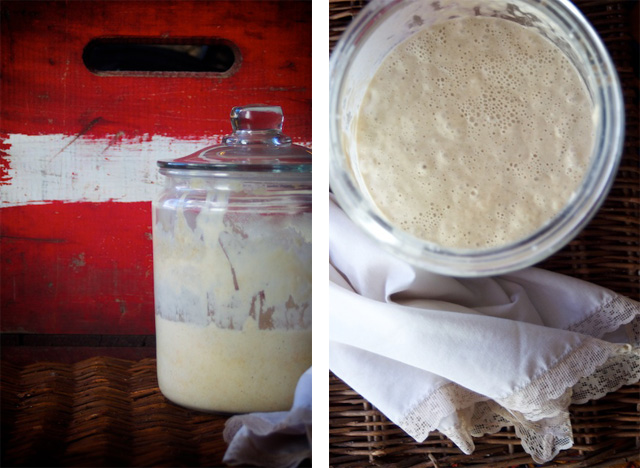
So here is the beginnings of my sourdough starter... I am planning on using it for THIS recipe on Sunday. Its funny.. there is a lot of prep work, but once you have an established sourdough starter, it is like a fountain of dough that you can continually use for baking. Dough that you know is not commercially processed and dough that you have looked after and guarded :)
I bought a sourdough starter from Cultures for Health to make sure my sourdough would be okay, since it was my first time.


So, here is my sourdough starter on day 5. It finally started bubbling! ITS ALIIIIVVVVEEEE!

Anywho, lots of new things going on in my kitchen... mostly, I'm actually in my kitchen... HA! thankful for a way to serve my family so practically.. their food!

Tuesday, November 27, 2012

Lentil Veggie Soup

I found this soup recipe on accident, actually... I was searching on google for my friend Carly's lentil soup recipe, I found this one instead... the one I initially was looking for is on my list to try, but for now... this is the recipe I have used and has gotten the hearty seal of approval from my family and dinner guests... As one college guy said "lentil soup is so hipster" ... ya, well, so what... it tastes good and is good for you :)

INA GARTEN'S VEGGIE LENTIL SOUP

Ingredients

  • 1 pound French green lentils
  • 4 cups chopped yellow onions (3 large onions)
  • 4 cups chopped leeks, white part only (2 leeks)
  • 1 tablespoon minced garlic (3 cloves)
  • 1/4 cup good olive oil, plus additional for drizzling on top
  • 1 tablespoon kosher salt
  • 1 1/2 teaspoons freshly ground black pepper
  • 1 tablespoon minced fresh thyme leaves or 1 teaspoon dried
  • 1 teaspoon ground cumin
  • 3 cups medium-diced celery (8 stalks)
  • 3 cups medium-diced carrots (4 to 6 carrots)
  • 3 quarts chicken stock
  • 1/4 cup tomato paste
  • 2 tablespoons red wine or red wine vinegar
  • Freshly grated Parmesan cheese

Directions

In a large bowl, cover the lentils with boiling water and allow to sit for 15 minutes. Drain.
In a large stockpot on medium heat, saute the onions, leeks, and garlic with the olive oil, salt, pepper, thyme, and cumin for 20 minutes, until the vegetables are translucent and very tender. Add the celery and carrots and saute for 10 more minutes. Add the chicken stock, tomato paste, and lentils. Cover and bring to a boil. Reduce the heat and simmer uncovered for 1 hour, until the lentils are cooked through. Check the seasonings. Add the red wine and serve hot, drizzled with olive oil and sprinkled with grated Parmesan.
Yummy!! I freeze portions of this soup for Ian to take to work for lunch and in 4 serving containers for future dinners.

Note: the only thing that takes a lot of time is chopping the veggies (which in cooking more frequently, has gotten faster) but it is still a "chop intensive" recipe. :)

Sunday, November 11, 2012

Chicken Bone Broth


I've been making my way through the Nourishing Traditions cookbook and a traditional food that has nourished people for centuries has been bone broth. Broth made from the nutrients found in veggies and bones of healthy animals.

Chicken soup is good for the body and soul and by making it yourself you know you aren't purchasing a chemical mix of tons of msg and other additives.

I found this recipe on the Nourished Kitchen blog. I've been perpetually making broth for many weeks now. It's so simple and can be the base of many soups and casseroles as well as a great body warming drink to consume by itself.

Broth is so great because as you heat the water and bones and veggies all together, the nutrients from the contents seep into the water, making the water a liquid, easy to assimilate, form of vitamins for your body. Helpful for the winter months as we don't get as much vitamin D from sun exposure. Here is some more info on the healthfulness of bone broth.


I freeze cubes in my baby food silicone freezer thingys and voila! 2oz portions of homemade broth whenever I need it!

You can use a raw whole chicken (Costco has organic chicken for $2.99 per pound) OR... what I have been doing... you can roast your chicken in the oven to make the meat super flavorful and yummy and then use the leftover bones and frame of the chicken for the broth, since the nutrients you are trying to get to are in the bones. My friend Carly just posted her fav recipe and it was a huge hit in our house this week... Even reese ate it. Which is amazing... YAY!


Nourished Kitchen's Perpetual soup

ingredients

  • 1 whole organic 
  • chicken (or the frame of a roasted chicken) 
  • sweet bay leaves
  • 1 tbsp 
  • black peppercorns
  • any  
  • vegetable scraps you have on hand
  • filtered water
  1. Place one whole chicken or the frame of a roasted chicken into your slow cooker with sweet bay, black peppercorns and any vegetable scraps you have on hand. Cover with filtered water and cook on low for one week.
  1. After twenty-four hours, you may begin using the broth. As you need broth or stock, simply dip a ladle or measuring cup into the slow cooker to remove the amount of stock you need. Pour it through a fine-mesh sieve or, preferably, a reusable coffee filter which will help to clarify the broth. Replace the broth you remove from the slow cooker with an equivalent amount of filtered water. If you’re using a whole, fresh chicken, you may also remove chicken meat from the slow cooker as desired for stir-fries, in soups or in 
  1. At the end of the week, strain off any remaining broth and discard or compost the bones. The bones from your chicken should crumble when pressed between your thumb and forefinger. Their softness is an indication that much of the nourishment from the bones – minerals, amino acids – have leached from the bones and into the broth you’ve enjoyed all week long. Wash the insert of your slow cooker and start again.

instructions

Thursday, November 8, 2012

Zucchini Bread or Muffins


Need an easy recipe for some tasty treats... My kids and hubs love this recipe and it really is super simple.
Reese calls them "cookie bread muffins" ;)


ZUCCHINI BREAD MUFFINS

INGREDIENTS:
  • 3 cups organic whole-wheat pastry flour 
  • 1 tablespoon cinnamon
  • 1 ½ teaspoons baking soda
  • ¼ teaspoon baking powder
  • ½ teaspoon salt
  • 3 eggs
  • ¾ cup coconut oil
  • ½ cup honey
  • 1 teaspoon vanilla
  • 3 cups grated zucchini
  • 1/2 cup of soy-free chocolate chips
DIRECTIONS:
  1. Preheat oven to 325 degrees.
  2. Mix up all of the dry ingredients.
  3. Make a hole in the center and pour in the eggs, oil, honey and vanilla. Stir just until mixed – Be careful not to over mix.
  4. Mix in the grated zucchini. Pour batter into greased loaf pan(s) or muffin holders and bake until a toothpick comes clean in the top/center of the loaf or muffin.
  5. Right when you take them out of the oven, stick the chocolate chips on the top of the muffins or loaf. 
  • Bake for 15 – 20 minutes and let them cool before giving to little hands :)
  • You can also put them in loaf pans and bake for about 20-30 minutes.
Enjoy!!! These puppies won't last long so make a double batch to freeze for leftovers!

Monday, September 24, 2012

weekly staples

I noticed something funny the other day. The kids finished out all the fruit leathers, gummy snacks, cereal bars, and peanut butter + honey granola bars I had made and I instinctively started on a new batch of all four. And then I realized... working in the kitchen does get easier and... shockingly... more enjoyable! I've been on a mission to swap our weekly staples for homemade versions and the kids and hubby are adapting quite nicely ;)

I thought I would share some of my weekly staples with you. I usually take about 2 hours on Saturday or Sunday evening to make all of the snacks for the week. It's much cheaper, way healthier, and it is a tangible way I can serve my family. Win Win Win!


I already posted about the cereal bars, fruit leathers and the gummy snacks (which I purchased a lego guy silicone mold for and the kids eat them even faster! ;)... But I found an awesome recipe for peanut butter + honey granola bars! Peace out Quaker!


DELICIOUS GRANOLA BARS
1/2 Cup of Local Raw Honey
2/3 Cup of Organic Peanut Butter 
1 Cup of Rolled Oats (for added nutritional benefit, soak your oats before you use them)
2 Cups of Crispy Rice Cereal (TJ's has a good brand with no added sugar)

optional:
raisins or chocolate chips or nuts... you decide! (or add nothing else... they still are tasty!)

Stir the honey in a medium size sauce pan and put on low heat. Stir continuously. The honey should thin out and be very liquid-y but not to a boil. Add the peanut butter and stir until very smooth. Turn off the heat and mix in the oats and the rice cereal. Add Raisins or nuts if you like. If you want to add chocolate chips, wait for mixture to cool a bit or else the chips will melt into the mixture... (which isn't a horrible thing ;)
Lay out parchment paper and dump the mixture on top. Use your hands and form the mixture into a square. Let them harden (or put in the fridge for 10 minutes to speed it up) and then use a pizza wheel to cut into rectangles.

Voila! Yummy and super simple! 

...
what are some weekly staples you find yourself making every week? My other staples is homemade chicken broth... but I'll blog about that later! 

Sunday, September 16, 2012

whole food resources

Hey all!

Was just looking at some foodie books on my nightstand lately and wanted to share ...

Nourishing Traditions by Sally Fallon
-This gem has been so so helpful. I've actually cooked a bunch from this and it seems super overwhelming because of its massive size, but most recipes are simple, easy and tasty! My fav loved the carrots vichey! And... I just bought grass fed beef liver to make one of the crazier recipes. Ah!! (Thank you Carly for the recommendation so many years ago ;)


La Cuisine de France: The Modern French Cookbook
Inspired to reconnect with Ian's family history... I want to do a Julie/Julia blog type thing. Mainly because my name is Julie, but also because it would be fun ;)


Real Food by Nina Planck 
-A down to earth perspective on the "why" behind eating naturally. Super easy to read and lots of scientific concepts in basic, understandable terms.

The Sprouted Kitchen by Sara Forte
This cookbook is by far the most beautiful. Gorgeous photos and a ton of variety in foods. Lots of veggie based dishes and over 100 recipes for all meals and snacks. 

In Defense of Food by Michael Pollan
I've mentioned this one before, but it is a handy reference guide too. A must read, I would say...

And.. some from my wish List:


tomorrow I've got a list of some good Bible books we have been enjoying too... 

have a blessed night!

Wednesday, September 12, 2012

fruity leathers

I don't know of any child who doesn't like a fruit roll up.. I mean, come on. You give a 30 year old a fruit roll up and they instinctively wrap it around their finger and start sucking on it like they are 5. 
Anyways... I've been experimenting with a way to make these from scratch because basically fruit roll ups are not really fruit roll ups, they are refined, processed sugar roll ups... which, is no bueno.

Enter the purchase of an appliance that has been on my list for a while... a dehydrator! I am having a little too much fun with this thing. Fruit Leathers, dried fruit, dried herbs and greens for smoothies... wa hoo!

I had a few recipes flop on my quest for the perfect fruit roll up, but I finally found something that works, tastes good, and is super simple... If you have a "warm" setting on your oven, or if your oven can go down to 130-150 degrees, then you can use that! But mine doesn't... enter the dehydrator. 
It is another kitchen appliance but it is a work horse and has been a fun addition to the real food way of living... I found THIS one on sale but I know there are lots of other brands that are great too. The Excaliber dehydrators (like the one in the video) are the best but I didn't want to drop a huge chunk of change for something I wasn't sure I would use. Sometimes the one I bought goes on even more of a sale at Amazon so check it out!

For the recipe, I used the video tutorial here:


super simple, easy and amazing!!!

BERRY FRUIT LEATHER
-Puree your berries (Raspberries, Strawberries or Blackberries seem to work best for me)
-add some unsweetened organic applesauce (organic apples as the ONLY ingredient)... or make your own apple or pear sauce/puree.
-Pour the mixture into a pot on the stove and heat on low to thin out the mixture, stirring frequently.
-pour onto fruit leather trays (and spray with a little coconut oil), or onto a silicone baking sheet (anything non stick)
-thin the mixture on the tray only slightly. It should be about 1/4" - 1/8" thick on the tray.
-dehydrate away! usually between 8-12 hours depending on how thick you make your layer of puree.
     ...you will know they are done when it is not goopy in the center anymore. 
-peel off and store!
     ...you can use wax or parchment paper to store them easily (and make it look even more like a fruit roll up)


My Swat team approved! I seriously couldn't get a picture of him holding it up because he eats the stuff so fast!


no added sugar, no ascorbic acid and no sad kids... let me know how it goes if you try it out!

Monday, August 6, 2012

dinner ideas

I wanted to do a little post on some dinner recipes that I have have reached "go-to" status in our abode.

Dinners have probably been the biggest challenge for me in transforming what our food looks like on a daily basis. Putting together a full family meal for my fam or for dinner guests used to consist of canned soups and veggies galore, packets of premade spices, cheap chicken or meat, grands biscuits, every night... you might think, well, what is so bad about those things? Well, all of it is processed... cooked and prepared by some gigantic factory. We can't be truly sure what is in all that food because of the lazy labeling laws in the US. "Natural flavoring" or "citric acid" are costumes for many yucky chemicals that are banned in most countries in the world. No joke.

So, basically... getting back to traditional eating. Cooking things from scratch with high quality, good ingredients. The "benefit" thing that has come from the industrialization of the American food system is cheap food... which has yielded rises in obesity, allergies, disease, and chronic conditions that plague this country.

Anywho, in my own kitchen, I am on a mission no to get back to the basics. Cooking good, quality whole food meals that don't come from a box with a happy glove on it.
For these recipes, just assume organic produce, meat, and dairy. If you are on a tight budget, spend the money on the dairy and meat to reduce your exposure to antibiotics, pesticides, and hormones.

FIRST COURSE
With dinner, we have added a dark leafy green salad (mixed baby greens, spinach, and/or kale +chard). Even sweet Cade has begun to eat this and now knows he is going to eat his salad with his dinner. Seriously, it is doable with your kiddos! Start small and use dressing and fruit and they will take little steps :)

So, in addition to our nightly salad, here are some dinner faves...

Chicken Fajitas
 - I make this all the time now! It is SO simple and SO SO SO delicious.
We make chicken tacos, chicken nachos, or just eat the mixture plain!

Crock Pot Chicken Fajitas 1 yellow onion, sliced
3 sweet peppers, sliced
1 ½ pounds boneless chicken breast or thighs
1/4 to ½ cup chicken broth, depending on preference
½ teaspoon salt
2 tablespoons cumin
1 ½ tablespoons chili powder
Squirt of lime juice
Tortillas
Fajita fixings

Combine sliced onion and peppers in the bottom of a greased crockpot. Lay chicken on top of veggies. Pour chicken broth over top. Sprinkle everything with cumin, salt, and chili powder. Give a nice quirt of lime juice over the top. Cover and cook on low for 8 hours (or on High for 4-6 hours). When meat is done, shred with two forks and stir back into juices. Serve meat mixture with slotted spoon on tortillas with your choice of fixings.

Pasta + MeatBalls
A bag of whole wheat pasta, quinoa pasta, or rice pasta + a jar of organic marinara sauce (or make your own sauce!)
+ add a cube of sweet potato or zucchini puree (I try to make these when the veggies are at my favorite farmer at the farmers market and freeze for use over the next few months) to the sauce while it simmers to add some veggie points.
+ add turkey meatballs or grass fed beef meatballs . TJ has yummy premade frozen turkey meatballs. Or you can make your own!


Make Ahead Frozen Meatballs RecipeThe Players
  • 1 small onion, chopped (or half a large one)
  • 1 1/3 C. bread crumbs (or cooked brown rice)
  • 1 1/2 tsp. Worcestershire sauce
  • 1 Tbsp. Italian herb blend
  • 1/4 tsp. pepper
The How-ToPreheat oven to 400F. In a large bowl, beat the eggs. Add the next six ingredients and mix well. Finally, add the beef and mix well. Shape the meatballs into one inch balls (should make approximate  100 meatballs). Place in single layers on ungreased 1-inch deep baking pans and bake at 400F for 10 minutes, until done.
Drain the fats and store for later use or (heaven forbid!) discard.
Once the meatballs and pans have cooled to the touch, place the meatballs (tray and all) into your freezer to “flash freeze” them. After they’ve frozen, remove the meatballs from the trays and transfer to plastic freezer storage bags or other freezer storage.
Keep stored in freezer and remove only as many meatballs as you need at a time. You can thank the flash freezing for that. It helps each meatball hold its individual shape and not stick to the other meatballs around it. This way, you can remove as few or as many meatballs as you need for whatever you’re serving up.
Reheat make ahead frozen meatballs on the stove, in sauces, or in the oven (350F for 20 minutes).
Enjoy!


Homemade pizza
1 Slice of Ezekiel Sprouted Grain Bread - or our other favorite... the Costco Organic Multigrain Whole wheat bread
Spread leftover marinara sauce (from pasta that week-that includes the veggie puree) and top with Raw Cheddar cheese + toppings
-bake in toaster oven for 10-15 minutes...
(I make two each for adults, and one for the kids)

Breakfast Burritos
-Scrambled Pasture Raised Eggs using real butter to "grease" the pan.
-lightly coat a griddle with coconut oil, cut up white and/or red potatoes into 1" pieces, "fry" until they are browned, stirring frequently
-cook two-four slices of nitrate free bacon
-add bacon and eggs to the potatoes and stir fry together, chopping and mixing up the goodies all together
-add to a homemade tortilla or a whole wheat (NO enriched flour!) tortilla and enjoy a breakfast burrito!
-or eat the mixture plain with a piece of ezekiel toast buttered or with berry preserves.

BBQ Chicken Salad
This salad is the main course, so we don't have an additional salad with this one :)
-Place 1-3 Organic Boneless Skinless Chicken breasts in your crock pot and pour one full bottle of Organic BBQ Sauce (TJ has a yummy one) over the chicken. Cover and crock pot for 8 hours... When putting together the salad, shred the chicken and use the excess bbq sauce for extra dressing.
-Darky Leafy Greens
-corn, boiled, then stripped for kernels
-black beans (organic canned is good if you don't have a bunch of black beans on hand :)
-home made tortilla strips, or organic corn chips crunched
-add shredded cheddar cheese
-add basil, tomato, cilantro and green onions if you like...
-Organic Ranch Dressing - look for a Ranch without soybean or canola oil
Mix it all up and be happy!

Taco Lettuce Wraps
-Use big Iceberg Lettuce slices for a little bowl
-fill with grass-fed taco meat (browned with homemade McCormick Taco Seasoning)
-top with usual toppings - avocado, cheese, cilantro, sour cream

DIY Taco Seasoning
Ingredients
  • 1 tablespoon chili powder
  • 1/4 teaspoon garlic powder
  • 1/4 teaspoon onion powder
  • 1/4 teaspoon crushed red pepper flakes
  • 1/4 teaspoon dried oregano
  • 1 1/2 teaspoons ground cumin
  • 1 teaspoon sea salt
  • 1 teaspoon black pepper

Mix all ingredients together and store in air tight container


Vegetable Soup
The one I make is a secret family recipe. So you will have to just come over to my house when I make it and try to figure it out. Seriously, I have been forbidden to post it :)
There are lots of recipes online especially on Pinterest. You can easily find one and just experiment!

Good ol Baked Chicken 
This was a monday night staple in our house growin up!
-Use skin-on chicken and just sprinkle some Seasoning Salt on top of chicken on a foil lined baking sheet. Bake at 400 for 40-50 minutes until it is cooked (use a meat thermometer).

-use boneless chicken breasts - dip in egg - dip in whole wheat organic breadcrumbs and lay on lightly oiled foil lined baking sheet - bake at 375 for 40-50 minutes or until it is cooked (use a meat thermometer).

-Try this recipe: Melt in Your Mouth Chicken Breast, 1/2 c parmesan cheese,1 c Greek yogurt, 1 tsp garlic powder, 1 1/2 tsp seasoning salt 1/2 tsp pepper,spread mix over chicken breasts, bake at 375 45 mins

-use boneless chicken breasts - dip in egg - dip in whole wheat organic breadcrumbs and lay on lightly oiled foil lined baking sheet - bake at 375 for 40-

Side Dishes
-Homemade tortilla chips

These are amazing!!!!! They taste so fresh and incomparable to bagged chips!!!


HOME MADE TORTILLA CHIPS: Ingredients:  1 package flour tortillas or 1 package corn tortilla 2 tablespoons oil 
Directions: 1 With a pastry brush, paint a very light coating of oil on one side of each tortilla. 2 Stack the tortillas greased side up in an even pile. 3 With a sharp, heavy knife (or serrated knife) cut the stack in half, then into quarters, then into eighths. 4 Separate the pieces and arrange them greased side up on a lightly oiled baking sheet. 5 Toast the chips in a preheated 350 degree oven for about 10 minutes or until they are crisp and just beginning to brown lightly; watch them closely so they don't become over baked.
Read more at: http://www.food.com/recipe/homemade-tortilla-chips-4378?oc=linkback

-Homemade Salsa (I'll post this amazing recipe later)

-Whip up some Quinoa, cous cous, or brown rice.

-Good Ol Steamed or roasted Veggies . Make this a staple in your meals. I prefer the taste of steamed veggies... broccoli, green beans, brussel sprouts (yes! I have begun to eat brussel sprouts! what?!?), carrots... you can steam all sorts of veggies! add good butter and enjoy!
-home made biscuits - these are so easy.

Basic Fluffy Biscuit Recipe 

    Ingredients:
  • 2 cups pastry flour
  • 1 tablespoon baking powder
  • 3/4 cup milk
  • 1/4 cup olive oil
    1. Preheat your oven to 350 degrees Fahrenheit.  Mix the pastry flour and baking powder together in a small bowl.  Then pour in the milk and oil.  Stir until the flour mixes completely with the liquids.

    2. If your mix is still a bit doughy, sprinkle in a little bit more flour, and mix with a fork until you can handle the dough with your hands.

    3. Oil a pizza pan or a plain cookie sheet, then roll your dough out onto the oiled pan.  Use a biscuit cutter (or just a household cup) to cut your dough out into as many biscuits as you need.

    Hint: The biscuits will be much fluffier if the dough isn’t rolled down really flat.  Roll the dough out so that the top of the dough is a half an inch to an inch above the pan, before you cut the dough into biscuits.

    4. Slip the biscuits into the oven, and bake on 350 degrees Fahrenheit for 18 to 20 minutes, or until golden.

    Butter and jam go well with this fluffy biscuit recipe, especially if you’re using the biscuits for breakfast.


So... I hope these are helpful for you! A little peak into my kitchen... I am learning, changing, and slowly getting used to new normals... to cutting up my own onions and peppers instead of buying bagged... actually trying new recipes from the cookbooks that have sat on my shelves begging for use...  making my own sauces and spice packets... hello! If I can do it... anyone can!!! :) Baby steps...


Thursday, July 12, 2012

Pam Pam bo bam banana fanna fo Fam

ok, now this was a big thing to give up for me... commercial cooking sprays...


WHAT?! give up sweet Pam!? yes... after doing a little research... I realized, all the additives and junk we were trying to cut out of our normal food... are included in the cooking sprays... even the organic kind... Just look at the can in your pantry... can you pronounce all the ingredients?

And... the whole "calorie free" claim is bogus... look at the servings size... 1/4 of a second spray... who does that?!?!?! So, they shrink the serving size to SO SO SO small to claim NO FAT and ZERO CALORIES! (which nutritional labels can claim if there is less than a .5 of a gram of fat... so if it is .5g of fat in 1/4 of a second spray... they can legally claim it is fat free...) So, if you spray it for 2 seconds, you are getting calories...

Now, oil is not the enemy, the yucky additives in the cooking spray is the ugly. And what is hard, the Genetically modified soy beans that are used in these sprays, aren't legally required to be labeled as Genetically Modified... a whole other issue...


The Examiner did a report on reasons why non-stick cooking sprays are not a good option... Here they are:


If cooking spray is a staple in your kitchen, here are four reasons to consider tossing out that iconic aerosol can:
1. Cooking sprays contain unhealthy additives
Home cooks typically don’t intend to add dubious ingredients like soy lecithin, mono and diglycerides, dimethylpolysiloxane, dimethyl silicone, or artificial flavors to their carefully selected meals, especially since the long term effects of these chemicals are still unknown. Nevertheless, many varieties of cooking spray contain exactly these things, especially when opting for artificially flavored varieties, like butter.
2. Cooking sprays contain genetically modified ingredients (GMO’s)
While things like soy, corn, or rapeseeds (canola) in and of themselves may not sound bad, the problem lies in the origin of the crops. Sadly, the vast majority of these foods (over 90 percent according to GMO Compass) are derived from genetically modified seeds, which have been altered so that growers can use more pesticides (without killing the plant itself) and therefore yield more crops.
According the American Academy of Environmental Medicine, animal studies have repeatedly shown serious health risks including infertility, auto-immune disorders, diabetes, and changes in major organs including the gastrointestinal system. The AAEM even went so far as to ask physicians to advise patients to avoid GM foods.
To further compound this problem, GM foods contain markedly higher levels of pesticides than conventional crops, increasing the risks of these already dangerous chemicals.
3. Cooking sprays contain soy
Although soy is typically viewed as healthy, people are consuming more of it today than at any other time in history. This is namely because it is an additive in just about every processed food available, leaving many experts fearing that there could be unintended health consequences to such overconsumption.
A Harvard University study, for example, reported that eating as little as one half serving of soy per day resulted in problems such as infertility in males and increased breast cancer risk in females. Other experts propose that the soy laden diet of today may also be a contributing factor in the increased incidence of soy allergies, which have increased by 50 percent since 1998, according to Nexus Magazine.
4. Cooking sprays may negatively impact lung health
In 2007, Seattle PI conducted studies on 22 leading cooking sprays. They found that even small amounts of the sprays, when heated, released high concentrations of diacetyl, a chemical that causes serious and even fatal respiratory disease under repeated, long-term exposure. Although manufacturers have since removed products containing diacetyl from the market, some health advocates fear that using aerosol products is still risky since the long-term effects of inhaling the particles and vapors of other artificial ingredients isn’t known.
So what is the solution? Do what your grandmother did and simply wipe down your pots and pans with organic, cold-pressed cooking oils such as olive or coconut. Or, if you simply must have a spray, most home goods stores sell hand-pump spray bottles designed to fill with any cooking oil you choose. You won't get that disgusting buildup on your cookware, and your body and the environment will be better off. "


Now... another solution... DIY Cooking Spray. I like how you can pronounce every ingredient :)

HOMEMADE COOKING SPRAY

Ingredients
1 part olive oil (or your choice of oil)
5 parts water
1 misting spray bottle (make sure its a misting spray bottle)
Instructions
Mix in your spray bottle 1 part olive oil to 5 parts water. In my 12 ounce bottle, I poured in 2 ounces of canola oil and added 10 ounces of water. Shake well and you’re done. That’s it. Store in a cool, dark place. Shake before using each time.
Sometimes change is hard and sometimes, it just might not be worth it to you... Again... I am just blogging about my own discoveries and what we are doing as a family. Please don't take these posts as judgements towards you if you choose not to eat like we eat... I just want it to be a journal of my journey and a help to anyone who might want some info. That is all :)

No bake energy bites

These have been popping up on Pinterest and we've made them a bunch but I forgot to put the recipe here!!!


(makes 18-20 bites)

1 cup oatmeal
1/2 cup peanut butter (or other nut butter)
1/3 cup honey
1 cup coconut flakes (optional... no coconut in our house)
1/2 cup ground flaxseed
1/2 cup mini chocolate chips
1 tsp vanilla

Mix everything above in a medium bowl until thoroughly incorporated.  Let chill in the refrigerator for half an hour.  Once chilled, roll into balls and enjoy!  Store in an airtight container and keep refrigerated for up to 1 week.

Make a bunch for hubby to take to work, kids to munch on, or for playdates!

Friday, July 6, 2012

breakfast cookies

easy. quick . yummy breakfast cookies anyone? whip up a small batch on monday and enjoy the whole week... these have been a hit with my little picky missy!


Breakfast cookies - 


preheat oven to 350 degrees


3 mashed bananas (ripe) - i blended them to a nice smooth consistency and it works great!


1/3 cup apple sauce


2 cups oats


1/4 cup almond milk


1/2 cup raisins 


1/2 cup chocolate chips


1 tsp vanilla


1 tsp cinnamon


mix it all up and bake for 15-20 minutes.


yummers!